Sunday, October 1, 2023

Sumptuous Healthy Vanilla Ice Cream (No Milk, No Eggs)

Sumptuous Healthy Vanilla Ice Cream (No Milk, No Eggs)

Hankering for a cool, creamy scoop of ice cream but want something more nutritious? This healthy vanilla ice cream hits the spot! Made with just a few simple ingredients like cashews, coconut milk, and pure maple syrup, it delivers all the rich, decadent flavor of traditional ice cream with a fraction of the fat, sugar, and calories. It's also no churn recipe, which makes it even better.


The cashews give this egg-free, dairy-free ice cream a lusciously smooth texture and creamy mouthfeel, while the coconut milk provides a subtle hint of natural sweetness.


A touch of vanilla bean paste intensifies the vanilla flavor beautifully. And using pure maple syrup instead of refined sugar keeps it feeling light yet satisfyingly sweet.


Healthy Vanilla Ice Cream


With this easy 4-ingredient recipe, you can whip up a batch of this wholesome homemade vanilla ice cream in just a few minutes. Simply blend everything together in a high-speed blender until smooth and creamy. Then freeze for a few hours until scoopable - that's it.


Next time a vanilla ice cream craving hits, reach for this nourishing cashew-based version. It offers all the classic flavor you love, but in a far healthier form, you can feel good about enjoying. One scoop and you'll be hooked!


Sumptuous Healthy Vanilla Ice Cream (No Milk, No Eggs)


- High speed blender

- Freezer-safe container


- 1 cup Raw cashews (soaked overnight and drained)

- 13.5 oz Can full-fat coconut milk

- 1/3 cup Pure maple syrup

- 1 tbsp Vanilla bean paste or vanilla extract

- 1/2 tsp Sea salt

- 1/2 tbsp Vanilla powder (Optional)


- In a high-powered blender, blend the drained cashews and coconut milk until very smooth.

- Add the maple syrup, vanilla, and salt. Blend again until fully incorporated.

- Pour the mixture into a freezer-safe container and place in the freezer for 8 hours or overnight.

- Remove from freezer and blend again until smooth and creamy. You may need to let it soften on the counter for 5-10 minutes before blending if too firm.

-

Return to freezer until set, about 2 more hours. Scoop and enjoy!


- Store leftover ice cream in a sealed container in the freezer.

DessertAmericanDessert, Vanilla ice-cream
https://nowhealth.online/sumptuous-healthy-vanilla-ice-cream-no-milk-no-eggs/

Thursday, September 28, 2023

Is Tropical Smoothie Healthy? The Results Are In

Is Tropical Smoothie Healthy? The Results Are In

Hey there health-conscious smoothie lovers! Is Tropical Smoothie healthy? This is the million dollar question when it comes to this incredibly popular smoothie chain. With over 1,000 locations across the U.S., Tropical Smoothie Café has become the go-to spot for a quick, tasty blended treat. But are their famously frosty fruit smoothies and other menu items actually nutritious? Or are they secretly packed with calories, sugar, and other diet downfalls?


What Is Tropical Smoothie Cafe?


Tropical Smoothie Café started slinging smoothies back in 1997 and now has over 1,000 locations across the U.S. They quickly became known for their wide array of frosted, fruity drinks. But Tropical Smoothie also serves up sandwiches, wraps, flatbreads, and salads to enjoy alongside their creations.


Is Tropical Smoothie drinks healthy?

You can walk into any Tropical Smoothie joint and order up a classic smoothie like strawberry or pina colada. They also have superfood smoothies packed with good-for-you ingredients like spinach, carrots, wheatgrass, and chia seeds. And if that's not enough customization, you can throw in supplements or fresh add-ins to really make it your own.


With so many options to mix and match, it's no wonder Tropical Smoothie cafés are a favorite spot for a quick breakfast, snack, or meal. Those smoothie machines are certainly kept busy whipping up both classic and crazy concoctions. But not all smoothies are created equal when it comes to nutrition, so let's break down what's in them.


Recommended: Are Potatoes Good For Weight Loss? Yes! With The Starch Resistance Hack


Is Tropical Smoothie Cafe Healthy?


Now to address the big question - is gulping down these smoothies actually healthy for you? Well, it depends…


While smoothies seem better than milkshakes or soda thanks to that fruit and veggie goodness, some are still jam-packed with natural and added sugars. The final sugar tally can easily exceed the American Heart Association's recommended max daily amount for women with just one massive smoothie!


For example, a few customer faves like the Bahama Mama and Peanut Butter Cup are tasty but have around 50g of sugar. That's more than 10 Krispy Kreme glazed donuts worth of sugar. Not exactly a "health" drink.


On the flip side, Tropical Smoothie's low calorie green smoothies clock in under 200 calories and skip the sugary add-ins, making them a solid choice. Ultimately, smoothies can be healthy in moderation if you choose wisely and balance out the sugar rush with healthier meals.


Tropical Smoothie Menu:


Now, let's explore the different smoothies and menu items so you can make the healthiest picks.


Tropical Smoothie has 2 main smoothie categories - the classic frosty fruit ones and the superfood smoothies packed with spinach, kale and other greens. Popular classic picks are the fruity Bahama Mama and Berry Acai Boost. On the healthier superfood side, you've got the Detox Island Green with spinach and pineapple.


Beyond smoothies, the menu includes breakfast flatbreads, sandwiches, wraps, quesadillas, and salads. Rounding it out are sides like sweet potato fries and jalapeno corn. The calorie counts vary widely across the menu offerings.


Lighter options are the Santa Fe quesadilla, Caribbean Jerk Chicken wrap, and Supergreen Caesar salad which all clock in around 300-400 calories. Meanwhile, the Three Cheese Chicken quesadilla hits 850 calories. As always, moderation and balance are key.


Diet-Specific Options


Tropical Smoothie aims to have options for any diet - low calorie, low carb, vegan, etc. The green smoothies made with leafy greens, fruits, and veggies make great choices for low cal, vegan, or gluten-free diets.


Meanwhile, the Classic Cuban sandwich or Buffalo Chicken Flatbread work well for low carb/keto diets at under 15g net carbs. Just be mindful of total calories. And most menu items can be modified, like subbing avocado for cheese. Ask about customizing to fit your dietary needs!


What Types Of Smoothies Are Available At Tropical Smoothie Cafe?


Alright, time for a smoothie menu deep dive. Let's see what delicious options Tropical Smoothie is blending up.


There are 10 classic fruit-based smoothies to pick from. We're talking strawberry, pina colada, peanut butter and banana, and more fruity flavors. Then you have 13 superfood options packed with spinach, kale, carrots, ginger, and other nutrient-dense ingredients.


Some creations mix and match both categories, like the Sunshine smoothie with strawberries, bananas, and spinach. You can also add a variety of supplements like whey protein and wheatgrass or fresh add-ins like chia seeds and peanut butter. Lots of ways to customize your smoothie!


Smoothie sizes range from kid-sized to mega, with calorie counts spanning from 180 to 780. Plenty of variety to choose from to find your perfect smoothie match!


Are There Healthy Options On The Tropical Smoothie Cafe Menu?


Alright, time to talk about the healthy stuff. Thankfully Tropical Smoothie does have some solid nutritious options amidst all those sugar bombs.


The healthiest menu item hands down is the Detox Island Green smoothie, clocking in at just 180 calories and loaded with spinach, kale, mango, ginger, and pineapple. It's naturally sweetened with no added sugars. A refreshing nutrient boost.


Other smart choices are the veggie-packed Hummus Wrap, Santa Fe quesadilla, and Caribbean Jerk Chicken salad. Stick to these under 400 calorie options as lighter meals. There are also lower sugar breakfast bowls and fresh fruit sides to balance out your order.


It just takes a little menu research and customization to put together a sensible meal at Tropical Smoothie. Their fruits, veggies, lean proteins, and whole grains can be part of a healthy diet with some thoughtful choices.


Is Tropical Smoothie Full of Sugar?


Alright, back to the smoothie sugar situation. Are these frosty drinks secretly sugar bombs?


Well, some certainly are. Fruit contains natural sugar, and it adds up quick when blended into smoothies. Some options like the Peanut Butter Cup take it over the top with added chocolate and peanut butter, packing nearly 70g sugar!


But there are low sugar choices too. The green smoothies made with veggies, greens, and a touch of fruit have just 7-15g sugar for the whole smoothie. Adding sugary supplements will spike those numbers though.


Bottom line - if limiting sugar is your goal, steer clear of chocolate, peanut butter, and excessive fruit add-ins. Prioritize smoothies with leafy greens, healthy fats, and minimal ingredients overall. And balance it out by avoiding sugary snacks and drinks the rest of the day. Moderation and customization are key for keeping tropical smoothie sugar in check.


Is Tropical Smoothie a Good Meal Replacement?


Can you swap out a full meal for a Tropical Smoothie smoothie or snack? Well, it depends…


For lighter meals, a smoothie with protein powder or peanut butter plus sandwich or salad makes a fairly balanced meal under 600 calories. But many smoothies with all the sugary add-ins can pack nearly a whole day's worth of calories.


If choosing a smoothie as a meal, opt for veggie-based ones under 400 calories. Or split a large smoothie into two servings. Pair it with proteins and healthy fats to stay full. And limit higher calorie sandwiches or quesadillas to lighter meals.


Ultimately smoothies make best breakfasts or snacks rather than full meal swaps. But customizing your order can make Tropical Smoothie part of a well-rounded eating plan.


Bottom Line - Is Tropical Smoothie Healthy?


In regards to the question "Is Tropical Smoothie healthy" the bottom line is that moderation is key. Choosing lower calorie green smoothies without chocolate or sugary add-ins allows you to enjoy these treats while maintaining healthy nutrition.


Pair lighter menu items like salads and wraps with your smoothie, and avoid making it your full meal replacement. With some customization and careful choices, Tropical Smoothie can absolutely be part of your healthy lifestyle.


https://nowhealth.online/is-tropical-smoothie-healthy-the-results-are-in/

Tuesday, September 26, 2023

The Best Paleo Banana Bread Recipe

The Best Paleo Banana Bread Recipe


I don't know what it is lately, but I've been hit with a serious baking bug! It all kicked off with pancakes, then veered into cupcakes territory, and even detoured into smoothies land (I know, not exactly baking, but who's keeping score?), and now, ... it's bread time.


Let me fill you in on my banana bread obsession. Every time I snag a bunch of bananas, there's always a couple that decide to go all out on ripeness. When they start getting speckled and mushy, I swiftly slice 'em up, chuck 'em in a freezer bag, and stash them in the freezer. They're like flavor bombs ready to explode in a smoothie or, drumroll again, banana bread!


Now, this recipe calls for a tad more action in the ingredient department, but trust me, it's worth every bit. So, round up the troops and let's jump headfirst into making the best paleo banana bread you've ever laid taste buds on. And guess what? No sugar in sight.


The best paleo Banana bread recipe - Ever


The Best Paleo Banana Bread Recipe


Do you hear that? Yes, that's the sound of me tooting my own horn - but for good reason. What makes this the best paeleo bread you ask? First, this recipe is absolutely delicious without veering away from the paleo diet. We're talking wholesome ingredients our ancestors would totally approve of - nuts, and almond flour. This is also one of those gluten-free breads, where you don't really notice it's gluten-free (and I mean that in the best possible way).


This bread is also a trailblazer for the sugar-free life. Instead of refined sugars that spike your blood sugar, we let ripe bananas bring the natural sweetness along with monk fruit sugar (which is fine for diabetics and those watching their blood sugar levels). This satisfies your cravings without the crash.


The Best Paleo Banana Bread Recipe, paleo banana bread nosugar


Now don't think this bread tastes like cardboard just because it's healthy. Au contraire! It nourishes your body with the good stuff and keeps your tastebuds happy too.


So whether you're full-on paleo or just want a slice of bakery goodness, this loaf is what you need.


The Best Paleo Banana Bread Recipe


Without departing from the paleo diet, this recipe is incredibly tasty. We're talking about healthful ingredients that our ancestors would approve of - nuts, and almond flour.


- Large Bowl

- Bread pan (approximately 24cm x 10cm x 6cm)


- 360 g Mashed ripe bananas (approximately 2 large bananas)

- 2 cups Almond Flour

- 1/2 cup Tapioca flour

- 5 g Salt

- 5 g Chemical yeast for cake

- 3 g Cinnamon powder

- 150 g Monk fruit sugar (or equivalent to regular sugar)

- 120 g Coconut oil (softened)

- 2 Eggs

- Optional: 75g walnuts (broken into rustic pieces (not included in calorie count))


- Preheat the oven to 180°C (356°F) and grease a bread pan. Line it with baking paper, leaving the ends uncovered.

- In a medium bowl, combine almond flour, tapioca flour, salt, chemical yeast, and cinnamon. Use a fork to mix well.

- In a larger bowl, mix together monk fruit sugar and softened coconut oil until creamy using a wire whisk.

- Add the eggs to the coconut oil mixture and continue whisking until homogeneous and shiny.

- Gently fold in the mashed bananas.

- Gradually add the dry ingredients from the medium bowl to the wet mixture. Mix until just incorporated.

- If using walnuts, fold them into the batter.

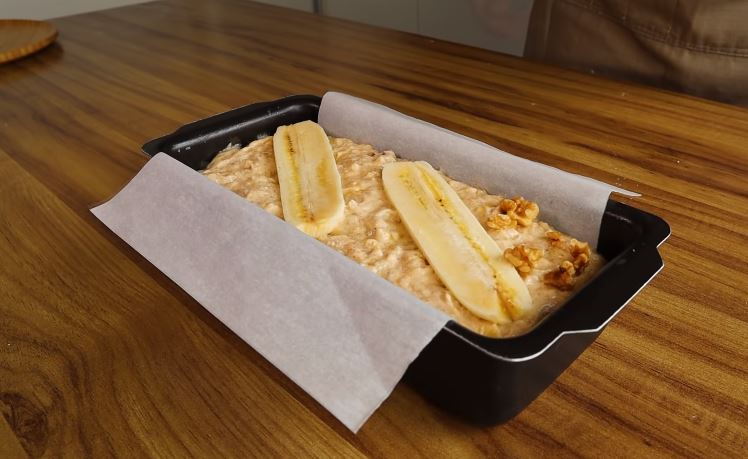
- Pour the batter into the prepared bread pan.

- Optionally, place a halved banana on top of the batter.

- Bake in the preheated oven for 40 to 50 minutes, or until the surface is well-browned and a toothpick inserted into the center comes out clean.

- Allow the banana bread to cool in the pan for about 15 minutes, then transfer it to a rack to cool completely.

DessertAmericanBest Paleo Banana Bread Recipe, Paleo banana bread, Paleo banana bread nosugar
https://nowhealth.online/the-best-paleo-banana-bread-recipe/

Monday, September 25, 2023

21-Day Flaxseed Cleanse - Detox Your Digestion And Burn Fat

21-Day Flaxseed Cleanse - Detox Your Digestion And Burn Fat


One of the most effective ways to detox and reset your digestion is with the 21-day flaxseed cleanse. This two-ingredient cleanse is a natural way to push out unwanted gunk with no downtime.


But you may be wondering why it's even needed, after all the body does a good job of cleansing itself - right?


Well yes and no. Here's the thing: your intestines are constantly at work, eliminating undigested food from your system. Although it can do all this without you noticing, sometimes things get a little ... backed up.


When this happens toxins can leach into the blood. Over time this toxic waste can lead to vision issues, hearing problems, diabetes, constipation, allergies, liver and kidney disease, hair loss, and of course weight gain.


This is why so many health experts recommend cleansing your colon before starting a new diet or weight loss plan. So if you're ready to get a new spring in your step and lose a few pounds to boot, we'll show you how to do this flaxseed cleanse in our step-by-step guide.


Cleanse Your Colon and Burn Fat with Flaxseed


As mentioned before, not everything you eat is always completely evacuated. When waste builds up in your intestines, it causes bloating, indigestion, inflammation, malabsorption issues, and (as accumulated waste impedes your metabolism) extra weight.


You could use enemas or shop-bought cleanses to detox your colon, but they only affect a small portion of it. On the other hand, eating ground flaxseed (also called linseeds) can cleanse your WHOLE colon by sweeping away mucus, waste, and parasites. And best of all, it keeps your gut flora intact.


A colon detox helps eliminate waste weighing you down, reducing bloat while slimming your body. Pair it with ultra-beneficial kefir and a healthy eating plan, and you've got a recipe for feeling lighter and more energetic.


What are the Benefits of Flaxseed And Kefir?


So what makes flaxseed and kefir such an incredible duo? Here are just a few of the incredible flaxseed benefits:


Flaxseed benefits

- Flax contains omega-3 fatty acids that balance hormones like estrogen. So it's a great anti-carcinogenic.

- It contains a substance that regulates blood pressure and improves arterial health.

- Flax is loaded with dietary fiber - more than any other grain. This fiber combo acts as a natural detoxifier and colon cleanser.

- Studies show flaxseed oil can actually help relieve conditions like IBD and Crohn’s by soothing inflamed intestinal linings.

- Flax is full of alpha-linolenic acids, a type of omega-3 that lowers “bad” LDL cholesterol levels.

- Flax even helps lower risks of breast, prostate, lung, and colon cancers.

- Helps soothe UTIs and kidney infections as well as reduce inflammation in the gut and respiratory tract

Kefir Benefits

- Contains probiotics - Kefir has a wide variety of probiotics that help improve gut health and digestion.

- Boosts immunity - The probiotics may help fight infections and strengthen the immune system.

- Aids lactose digestion - The lactase enzymes in kefir help those with lactose intolerance digest dairy better.

- Anti-inflammatory effects - Compounds in kefir can help reduce inflammation in the body.

- May improve cholesterol - Kefir contains compounds that may help lower "bad" LDL cholesterol.

- Rich in nutrients - Good source of protein, calcium, phosphorus, vitamin B12 and vitamin K.

- Easy to make - Simple to brew your own kefir at home with just milk and grain

When you combine flax with probiotic-packed kefir, it's a match made in gut health heaven! The dynamic duo cleanses the colon while the kefir replenishes the good belly bacteria.


21-Day Flaxseed Cleanse


21-Day Flaxseed Cleanse

The key to the flaxseed cleanse is sticking to it for 2-3 weeks to fully flush your system. This two-ingredient colon cleanse naturally eliminates toxins so you lose weight and burn fat fast. It regulates your cholesterol and blood sugar too.


You can find the 21-day flaxseed cleanse below:


Get yourself whole flaxseeds and a coffee grinder to pulverize them into fresh powder. Also, grab kefir or plain Greek yogurt if you can’t find kefir.


Then before breakfast, whip up this slimming combination:


Week 1: Mix 1 tbsp flax powder with 100 ml kefir


Week 2: Mix 2 tbsp flax powder with 100 ml kefir


Week 3: Mix 3 tbsp flax powder with 150 ml kefir


Drink all this before eating. The flax acts as a gentle internal broom to sweep away toxins and waste, the kefir replenishes good probiotics for gut health.


Rinse and repeat for 3 weeks to fully cleanse and de-bloat. For 3 weeks, load up on raw, cooked veggies and antioxidant-packed fruits. Get your grains, nuts, and proteins from plant sources like beans or powders (meat is tougher to digest). Drink 2 liters of water daily to flush your system.


Benefits of Eating Flax Seeds on an Empty Stomach


One of the main benefits of eating flaxseed on an empty stomach (particularly for weight loss) is all in the fiber. Eating the ground seeds before your first meal of the day makes you feel fuller and absorb less cholesterol from food.


Flax can treat constipation, high cholesterol, diabetes, kidney issues, and obesity. It sweeps waste out of your system, helping you cleanse and lose weight.


21-Day Flaxseed Cleanse- tips for storing


- It’s best to grind whole flaxseeds fresh daily and use them in the morning. This prevents the oils from going rancid.

- Already ground flax meal can be stored in the refrigerator to maximize shelf life too. Just seal it up airtight.

- No matter what, keep your flax in the fridge or freezer to protect all those healthy fats and oils. Room temp is a no go.

- When ready to use, grind up whole flaxseeds into a fine powder. If using meal, mix up what you need and consume immediately. Don’t let pre-ground sit around once exposed to air and moisture.

- Drink plenty of water when enjoying flax to aid digestion. Staying hydrated is key.

- Proper storage means your flax keeps on flexing its health and weight loss benefits.
https://nowhealth.online/21-day-flaxseed-cleanse/

Sunday, September 24, 2023

50 Foods To Avoid On Keto

50 Foods To Avoid On Keto

Foods To Avoid On Keto


The main goal of the keto diet is to reach ketosis - when your body switches from burning carbs to burning fat and ketones for fuel. Talk about a metabolic shift!


To get into ketosis and stay there, you've got to dodge foods too high in carbs. Here's why:


Carb molecules are super easy for your body to break down into quick energy. So if you eat a lot of carbs - especially all at once - your body will default to using that for fuel instead of turning to fat. Keto is all about tapping into fat. Below are foods to avoid on the keto diet.


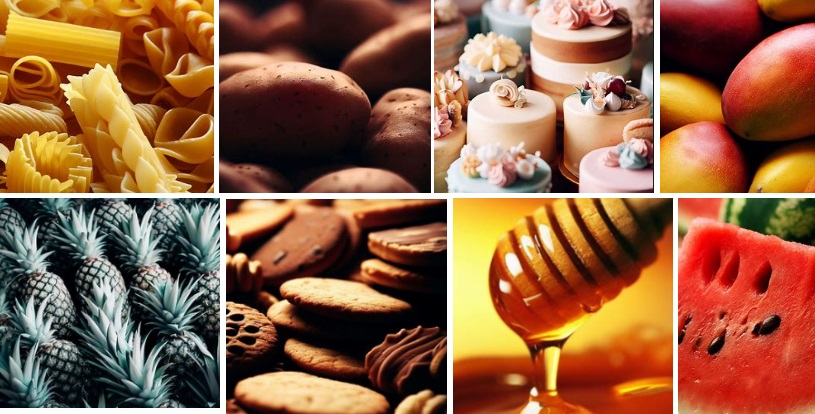
Bread (white, wheat, etc.)High in carbsPasta (regular and whole wheat)High in carbsRice (white and brown)High in carbsPotatoes (including sweet potatoes)High in carbsCorn and corn productsHigh in carbsBeans (kidney, black, pinto, etc.)High in carbsLentilsHigh in carbsQuinoaHigh in carbsOats (rolled and instant)High in carbsBarleyHigh in carbsBananasHigh in carbs and sugarApplesHigh in carbs and sugarOrangesHigh in carbs and sugarGrapesHigh in carbs and sugarMangoesHigh in carbs and sugarPineapplesHigh in carbs and sugarWatermelonHigh in carbs and sugarProcessed snacks (chips, crackers)High in carbs and often unhealthy fatsCookies, cakes, and pastriesHigh in carbs and sugarSugary cerealsHigh in carbs and sugarSugary drinks (sodas, fruit juices)High in carbs and sugarIce creamHigh in carbs and sugarCandyHigh in carbs and sugarHoneyHigh in carbs and sugarMaple syrupHigh in carbs and sugarAvoid most fruitsDue to their high sugar contentAlcohol Can interfere with ketosisMost fruit juicesHigh in sugarHigh-sugar condiments (ketchup, BBQ sauce)High in sugarBaked goods with refined flourHigh in carbsFlavored yogurtOften high in sugarRegular milkContains lactose (a type of sugar)Sweetened yogurtsHigh in sugarLow-fat and fat-free productsOften contain added sugarsHigh-sugar salad dressingsHigh in sugarHigh-sugar sauces (teriyaki, sweet and sour)High in sugarCanned fruits in syrupHigh in sugarProcessed meats with added sugarsCheck labels for hidden sugarsStarchy vegetables (like peas and corn)Higher in carbsTrans fats (partially hydrogenated oils)Unhealthy fatsMargarineOften contains trans fatsVegetable oils high in omega-6 fatty acidsCan be inflammatory in excessSweetened nut buttersHigh in sugarFlavored syrups High in sugarGranolaHigh in carbs and often sugarLow-fat or diet productsOften contain added sugarsHigh-sugar energy barsHigh in sugar
https://nowhealth.online/foods-to-avoid-on-keto-2-foods-to-avoid-on-keto/

Saturday, September 23, 2023

Weight Loss Diet For 3 Days


The 3-day carrot diet is a short-term dietary plan centered around consuming primarily carrots for three consecutive days. It involves incorporating various forms of carrots into meals, such as raw, cooked, or juiced. The diet is often touted as a way to boost vitamin A intake and promote weight loss due to carrots' low calorie content and high fiber content. However, it's important to note that this diet is highly restrictive and may not provide a balanced range of nutrients necessary for long-term health. It's advisable to consult a healthcare professional before starting any new diet, such as the 3 day carrot diet especially one as restrictive as this. 


https://nowhealth.blog.fc2.com/blog-entry-1.html

Friday, September 22, 2023

DIY Probiotic Water (Just 2 Ingredients!)- A How-To Guide

DIY Probiotic Water (Just 2 Ingredients!)- A How-To Guide

I'm pumped to show you how to easily whip up your own DIY probiotic water right in your kitchen. This simple recipe takes just a few minutes and basic ingredients you likely already have at home.


Brewing your own probiotic water is super cost-effective compared to buying fancy bottled brands. And the whole family can enjoy it - kids and adults alike!


The benefits of probiotics are endless - improved digestion, immunity, skin health, you name it. But store-bought drinks can get pricey. With this DIY approach, you can enjoy home-fermented probiotic water every day on the cheap!


I love that making your own allows you to control exactly what goes in it too. You can choose raw, local honey for its health properties. And adapt the ferment time to make it as strong as you like.


Home fermentation sounds intimidating but I promise this recipe is fool-proof. All it takes is a jar, some honey, probiotics and a little patience. No fancy equipment is required.


Even if you've never fermented anything before, you can totally nail this on your first try. I'll walk you through each simple step.


You're Going to Need:


- A sanitized mason glass jar filled with purified water (avoid tap water with chlorine)

- Raw honey (I like buckwheat honey for its deep, rich color and unique flavor)

- Probiotic capsules

Why This Probiotic Water Works


When making probiotic water, the honey and probiotics each serve an important purpose:


The honey is there to feed the probiotic bacteria and fuel the fermentation. Just like us, probiotics need food to thrive. The natural sugars in raw honey make it the perfect probiotic snack.


As the probiotics munch on the honey, they start to rapidly multiply and populate the water. This growth is what creates the bubbles, foam, and other signs of fermentation.
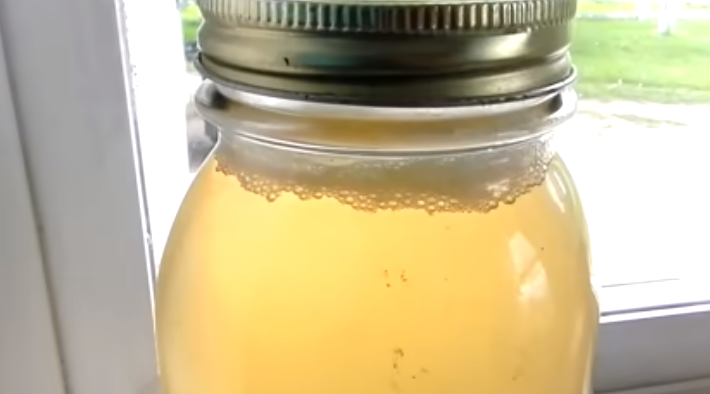


DIY Probiotic Water

Meanwhile, the probiotic bacteria also produce beneficial compounds like acids, vitamins, and enzymes that infuse the water with gut-healthy properties.


That's why strained probiotic water becomes filled with more than just live bacteria - it becomes a nutrient-packed tonic.


The probiotics we add are what start this whole transformative process. Without probiotic bacteria, the honey water would simply sit there and nothing would happen.


But once we add the probiotic powder, the live cultures kickstart fermentation. They act as little microscopic workers that ferment the honey and turn our jar of water into a functional probiotic drink.


It's amazing how a few simple ingredients - water, honey, and probiotics - can transform into a health-promoting elixir through the power of fermentation!


How To Make Probiotic Water Step By Step


Here's the easy step-by-step way to create this amazing probiotic water.


1. Adding the Honey

Add 1⁄2 to 1 teaspoon of honey to the jar of water. The honey will act as food for the probiotics during the fermentation process.


2. Adding the Probiotic Capsules

Next, open up a probiotic capsule. Try to choose a high-quality one, this will reflect in the end product. We recommend Primal Harvest but you can use any good quality probiotic of your choice. Sprinkle about half of the powder into the honey water. Put the lid on the jar tightly and give it a good shake to mix it up.


The Fermentation Process


Alright, fermentation time. Pop your jar onto a windowsill out of direct sunlight and let it do its thing for 2-3 days.


I've never had issues leaving it on the sill, even with light exposure. The fermentation magic happens regardless.


Over the next few days, you'll see bubbles start to rise up and foamy stuff will form at the top. This is totally normal - it means healthy probiotic activity. But it won't get fizzy or carbonated like kombucha.


You may notice some brown floaty bits, these are perfectly fine

Around day 4, you might notice some odd floaty bits and brown stuff. I know, it looks funky! But this is just waste from the hardworking probiotics. It's a good sign they’re reproducing and fermenting like crazy.


While it may look gross, it means your probiotics are active and chowing down on that honey food. Still, you probably don’t want to drink the floaties - so just strain them out.


When you’re ready to enjoy your probiotic water, grab a new clean jar and pour it through a mesh strainer. This catches all the brown floaty bits, leaving just the good stuff!


Pop on the lid, and your homemade probiotic water is ready to go.


Making The Starter


Alright, once you've enjoyed a healthy and gut benefiting probiotic water, it's time to make some more. Let's look at how to make a "starter" for your next batch.


- Towards the end of your current jar, save about 1⁄4 of it to use as a starter. Then top off the jar with fresh purified water.

- Add another 1⁄2 to 1 tsp of honey - this gives those probiotics fuel to keep on fermenting and reproducing.

- Pop the lid on tight and shake it up to mix (unlike me, try not to spill everywhere!).

- Now simply return the starter jar to the windowsill for another 2-3 days of fermentation.

Those active probiotic cultures will get right back to work fermenting the honey water. This starter liquid gives your next batch a boost by populating it with thriving probiotic bacteria.


Troubleshooting Tips


No Foam or Floaties

Don't freak out if your probiotic water doesn't foam up or develop brown floaties during fermentation. This alone doesn't mean it failed. Instead, open the jar and take a sniff. Does it have a light, sweet, tangy fermented scent? If yes, then fermentation likely happened successfully!


I've had many batches that didn't foam or float but smelled deliciously fermented. Visible bubbling isn't required.


However, if it smells exactly like plain water, fermentation probably didn't take place. Try adding more probiotics and honey, and ferment somewhere warmer. My house stays around 70°F year-round which is ideal. If your home is cooler, the warmer temperature will help kickstart fermentation.


Be patient and give it another 2-3 days before tossing the batch. With some troubleshooting, you can still rescue lagging fermentation.


Extended Fermentation Time

What if you end up letting your probiotic water ferment for longer than the recommended 2-3 days? Not to worry! Leaving it for 5, 7, 10 days, or even longer is totally fine. Here's the thing - extended fermentation time simply allows the probiotics to become more active and populate more densely. This results in a brew that's extra strong in probiotics!


The downside is that the taste and smell will become much more intense and tangy. But I promise, there's no harm in letting it go extra long. I've left batches sitting for a week or more just because life got busy. Even 2 weeks is OK. The probiotic water just gets ultra funky, sour, and fizzy - but it's still safe to drink.


The probiotics actually reach their peak activity around 7-10 days in. After that, they start to die off, and the benefits plateau.


So feel free to let it ride longer than 3 days if you want maximum probiotic power. Just be prepared for a strong sour kick. Some folks dilute it before drinking if it gets too intense.


When To Throw Out A Batch Of Probiotic Water

I want your probiotic water to be safe, so let's talk about when to throw out a batch.


If you notice any mold, fuzz, or odd colors like black, green, or pink - toss it. The same goes for a truly rancid, rotten smell. The fermentation smell should be sweet and tangy, not foul.


I know it's hard to waste a batch, but don't drink any probiotic water with weird textures/colors/smells. Safety first!


Even saving the starter liquid is risky if the batch goes bad. Best to thoroughly sanitize your jar and start a fresh new batch from the beginning.


Bottom Line - DIY Probiotic Water


And there you have it folks - everything you need to know to start brewing your own probiotic gut health elixir!


I hope this guide gets you pumped about the possibilities of DIY fermentation. Homemade probiotic water puts store-bought to shame.


Imagine waking up to a refreshing glass of your own custom probiotic water every morning - your gut and immune system will thank you!


It only takes a few minutes of hands-on time and a little planning. The fermentation magic happens on its own.


Give it a try this week and let me know how your first batch turns out! I absolutely love hearing about your adventures in home fermentation.


And remember - have fun with it! Flavor your water with different types of honey, fruits, herbs, you name it. Get the whole family involved.


Here's to happy guts and better health. Cheers to homemade probiotic water.


https://nowhealth.online/diy-probiotic-water/