Tuesday, January 16, 2024

How To Get Rid Of Neck Hump Fast: The 3 Best Exercises

How To Get Rid Of Neck Hump Fast: The 3 Best Exercises

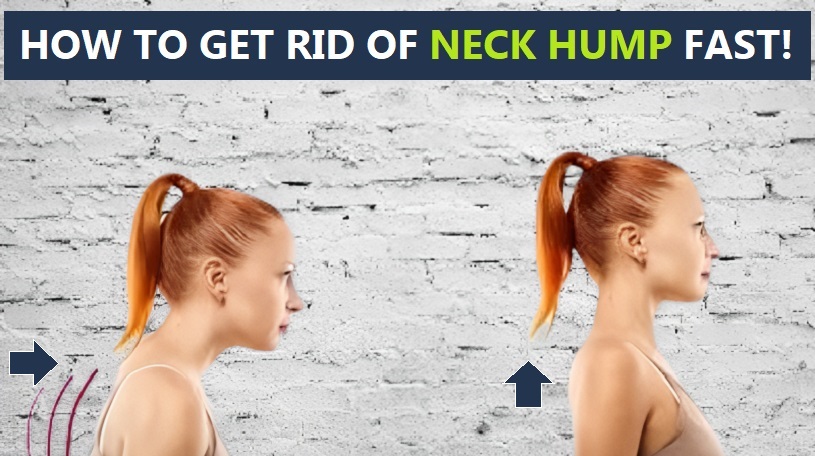
Have you spotted a little extra something on the back of your neck lately? No need to panic - that bump is quite common actually.


We've all heard of the classic "dowager's hump" - so named because it's something that tends to develop over time as bad posture habits pile up. No judgement here of course, we've all been guilty of stressing our poor spines at one point or another.


The good news is, with just a few simple tweaks and targeted exercises, your neck curve can start correcting itself before too long. I know from experience just how much of a relief it is to see that hump shrinking away.


We've got some effective exercises for neck humps below, which are very good at correcting the posture. With that said, let's look into how you can tackle this condition.


What Causes Neck Humps


So we've heard it called dowager's hump or buffalo hump before - both good descriptors for how it makes our necks take on a more rounded appearance. Btw, the medical term for this condition is cervical lordosis.


Essentially, over time our posture muscles get used to holding us in positions that pull our heads forward and shoulders rounded. Things like hunching over desks, phones, even just carrying around heavy purses can all contribute.


So the main causes of a buffalo hump (neck hump) are...


- Poor posture habits are a primary cause as they shorten muscles at the back of our necks and upper backs.

- Chronic stress also plays a role. High cortisol levels from being frazzled frequently signal our bodies to bulk up the trapezius muscles as a defense response - further emphasizing the rounded look.

Now while posture flaws alone can start the process, stress definitely amplifies it through muscular compensations. The two factors tend to reinforce each other if left unaddressed long term.


It's also worth noting some rare medical conditions like Cushing's syndrome can cause excess cortisol production and lead to hump development more severely. But for most of us, daily posture issues are the real culprit we can improve through conscious effort.


The good news is with awareness and targeted exercise, we have the power to reverse these impacts and return our necklines gracefully back to baseline over time.


How to Sleep to Fix Your Neck Hump


how-to-correct-neck-hump.

When it comes to optimizing sleep posture, paying attention to your pillow placement is key for neck hump reversal. Here are some tips:


- Avoid sleeping on your stomach if you have a hump. This arches your neck at an extreme angle all night.

- Back sleeping is better, but use only a thin pillow or fold your regular one in half. You want just enough support to keep your neck straight.

- Side sleeping is great as long as your shoulders aren't rolled forward. Opt for a low, narrow pillow that doesn't tilt your head down at all.

- You can also try sleeping without a pillow for a flatter surface. Use your judgment based on your comfort levels.

The goal is to prevent further flexion of your neck all through the night. Your natural spine curve should continue right down through your shoulders when lying horizontal.


If you tend to toss and turn, mindfully adjust yourself back into good form when waking to change positions. Self-massage your upper back muscles before bed too for better support.


It takes vigilance at first, but soon your muscles will re-learn the proper alignment subconsciously. Within a few weeks your hump should see improvement just from sleep alone.


How to Get Rid of Neck Hump Fast with These Exercises


If you're eager to flatten your neck curve in a hurry, focus your routine on these super-effective exercises:


Chin Tucks

exercises for neck hump


Chin tucking is an important exercise that targets the back of the neck muscles (suboccipitals). It helps correct forward head posture and reduces neck tension.


Steps for the chin tuck exercise


- Start by standing or sitting tall with your shoulders back and down.

- Place one finger on your chin and one on the back of your head.

- Gently tuck your chin inward toward your chest so your ears shift slightly back and over your shoulders.

- You should feel a stretch in the back of your neck but not pain. Hold for 5 seconds.

- Return your head to the neutral starting position and repeat.

- Do 10-15 repetitions, holding for 5 seconds each time.

- For extra challenge, do chin tucks against a wall with your head and upper back in contact.

- You can also pair chin tucks with other exercises like shoulder rolls for better posture training.

Be sure not to crank your neck too far or bounce. Go slowly and focus on good form for safety.


Foam Roller Release

how-to-get-rid-of-buffalo-hump

Roll the upper back daily for 5 minutes, paying extra time to knotted areas - this is a technique called Myofascial release. This is a soft tissue manipulation method.


Here are the basic steps to perform foam roller exercise


- Lie on your back on the floor with a foam roller positioned vertically at the base of your neck/top of upper back.

- Position your arms out to your sides for support and balance your body weight evenly.

- Slowly roll your neck and upper back up and down the length of the roller in a controlled motion.

- Apply gentle-to-moderate pressure on tight or knotted muscle areas, allowing the roller to knead into the tissue.

- Inhale as you roll up the muscles, exhale as you roll back down.

- Roll back and forth over the trapezius muscles on each side of your neck/shoulders.

- Roll in smaller motions on any especially tender spots that arise.

- Roll for 1-2 minutes per side, taking breaks as needed.

- Repeat the routine 2-3 times per week for 6-8 weeks to see results.

- Stretch and foam roll daily to reinforce good posture and continue releasing muscle tension.

The key is applying steady, deep pressure to lengthen tight upper back muscles over time through this myofascial release technique.


Wall Angels
how to get rid of neck hump fast

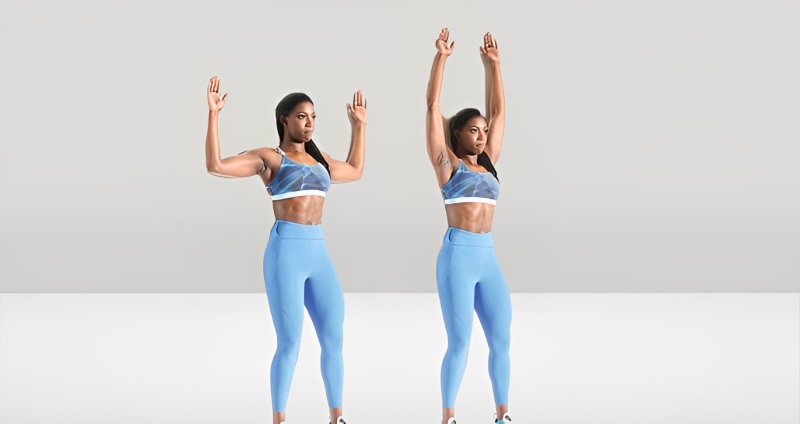
Here are step-by-step instructions for doing wall angels:


- Stand with your back facing a wall, about 1-2 feet away from it. Your heels, butt, shoulders, and head should all be in contact with the wall.

- Raise your arms out from your sides so they are parallel to the floor, with your palms facing down. This is the starting position.

- Keeping your heels, butt, and head in contact with the wall, slowly raise your arms up toward the ceiling until they are directly above your shoulders. Your arms should form a "Y" shape.

- Continue to raise your arms up as high as you comfortably can while maintaining contact with the wall with your lower body. Hold for 1-2 seconds.

- Slowly lower your arms back down to the starting position by your sides, maintaining contact with the wall.

- Repeat the movement of raising your arms up and lowering back down for 10-15 repetitions.

- For more challenge, you can raise only one arm at a time while keeping the other anchored by your side. Alternate sides.

- Be sure to keep your back flat against the wall throughout the movement and don't hunch your shoulders up by your ears.

That's it! Wall angels target your upper back and shoulder mobility.


You can also take a look at the video below for some powerful neck hump-reducing exercises


https://www.youtube.com/watch?v=C9QJIuIXAp4&t=155s&pp=ygUnaG93IHRvIGdldCByaSBvZiBhIG5lY2sgaHVtIDMgZXhlcmNpc2Vz

 How Long It Takes to Lose a Neck Hump?


The timeline for reducing a neck hump depends on factors like exercise consistency and lifestyle habits, as well as our ability to lower chronic stress levels over time.


High cortisol from stress contributes to neck humps by triggering compensatory muscle growth. Decreasing cortisol through relaxation techniques and eliminating stressors can directly impact the rate of improvement.


Here are some revised timelines that factor in cortisol reduction:


- 4-8 weeks: Daily exercises along with relaxing tecniques such as deep breathing, etc. can start lowering cortisol and smoothening 30-40% of the neck curve.

- 2-6 months: Consistency with posture rehab plus lifestyle tweaks like relaxing massages, quality sleep, social support will likely shrink the hump 40-60%.

- 6-15 months: For a fully corrected neckline, plan for it to take up to a year with continued mindfulness practices and healthy stress coping strategies helping cortisol decline close to normal levels.

The key is making neck exercises just one part of an overall self-care routine focused on reducing chronic stress physiology over the long haul. A multifaceted approach will give the body the best chance to fully revert muscle changes caused by high cortisol exposure over time.


https://nowhealth.online/how-to-get-rid-of-neck-hump-fast/

Thursday, January 4, 2024

Walk at Home Workout: Boost Your Fitness Journey with Simple Steps


Introduction


Welcome to a transformative fitness experience – the walk at home workout. In a world buzzing with high-intensity workouts and complex routines, we bring you a refreshing approach that requires nothing more than a pair of comfortable shoes.

We understand the importance of making fitness accessible, and our walk at home workout is designed to cater to individuals of all fitness levels.


The Benefits of Walking at Home

1. Low-Impact, High Returns

Unlike strenuous workouts that might be intimidating for beginners, a walk at home workout is low-impact and easy on the joints. It's a fantastic way to kickstart your fitness journey without risking injury. The simplicity of walking is deceptive – it is a powerful cardiovascular exercise that can yield impressive results.

2. Convenience at Your Doorstep

Our walk at home workout eliminates the need for gym memberships or complicated equipment. You can seamlessly integrate it into your daily routine, whether it's before work, during lunch, or in the evening. No commute, no crowded spaces – just a convenient workout that fits your schedule.

3. Suitable for All Ages and Fitness Levels

Fitness knows no age limits, and neither does our walk at home workout. Whether you're a fitness enthusiast or a senior looking for a gentle exercise routine, walking is adaptable to every age and fitness level. It's a family-friendly activity that promotes overall well-being.


Getting Started: A Step-by-Step Guide

1. Choose the Right Footwear

Before you embark on your walk at home workout, ensure you have the right footwear. Invest in supportive, comfortable shoes that provide stability and cushioning. This simple step can significantly enhance your walking experience and prevent potential discomfort.

2. Warm-Up and Cool Down

Just like any other exercise routine, warming up is crucial to prepare your muscles for activity. Start with gentle stretches and gradually increase your pace. After your walk, don't forget to cool down with some stretches to improve flexibility and reduce muscle soreness.

3. Set Realistic Goals

Whether you're a beginner or aiming to increase your walking intensity, setting realistic goals is key. Start with a manageable distance and gradually challenge yourself to go further. Tracking your progress not only keeps you motivated but also allows you to celebrate your achievements.


Making It a Lifestyle

1. Consistency is Key

To truly reap the benefits of a walk at home workout, consistency is paramount. Aim for at least 30 minutes of brisk walking most days of the week. Establishing a routine ensures that exercise becomes a habitual part of your lifestyle, leading to long-term health benefits.

2. Mix It Up

While the simplicity of walking is its charm, you can add variety to your routine. Incorporate different routes, explore local parks, or even invite friends to join you. Adding variety keeps things interesting and prevents monotony.


Join the Walk at Home Community

1. Connect with Like-Minded Individuals

Embark on your fitness journey with the support of a community. Join online forums, social media groups, or local walking clubs to connect with individuals who share your enthusiasm for the walk at home workout. Sharing experiences and tips can enhance your motivation and make your journey more enjoyable.

2. Share Your Progress

Celebrate your successes and share your progress with the community. Whether it's reaching a fitness milestone or discovering a beautiful walking trail, your journey can inspire others to embrace the walk at home workout.

Conclusion

At [Your Company Name], we believe in the power of simplicity when it comes to fitness. Our walk at home workout is not just a routine; it's a lifestyle that prioritizes accessibility and inclusivity. Start your journey today, and experience the joy of fitness at your own pace.


Tuesday, January 2, 2024

Bile Deficiency Signs and Symptoms - What to Look Out For

Bile Deficiency Signs and Symptoms

Bile Deficiency Signs and Symptoms


Bile is an important digestive fluid produced by the liver and stored in the gallbladder. It helps in the breakdown and absorption of fats. A low bile production or lack of bile secretion can lead to several symptoms known as bile deficiency. So let's look at some of the signs of bile deficiency.


Key symptoms of bile deficiency


Fatigue and lack of energy


Bile plays a vital role in fat digestion. When bile production is low, fats cannot be properly absorbed resulting in malabsorption and nutritional deficiencies. This can cause constant fatigue.


Pale, smelly stools


Undigested fats in the stool make it pale, loose and foul-smelling. This is known as steatorrhea.


Itchy skin


Malabsorption of fat-soluble vitamins like A, D, E and K due to low bile can cause dry, itchy skin and dermatitis.


Weight gain or difficulty losing weight


With impaired fat breakdown and absorption, calories from dietary fats are not utilized. This can lead to weight issues.


Gas and bloating


Undigested fats in the intestines cause abdominal pain, gas, bloating and discomfort.


Flatulence


Malodorous flatulence is also common with higher levels of undigested fats passing through the digestive tract.


Acne


Deficiencies in fat-soluble vitamins and fatty acids due to low bile can aggravate acne problems.


Fatigue after meals

Incomplete digestion of fats causes a "tired and sleepiness" feeling after meals.


Testing and diagnosis


A doctor may check for elevated liver enzymes and request tests like LFTs, ultrasonography and HIDA scan to detect gallbladder dysfunction if bile deficiency is suspected. Treatments include managing weight, improving diet, bile salts supplements and in some cases gallbladder removal. Making lifestyle changes and following a low-fat diet can help alleviate symptoms.


Conclusion


Bile plays a key role in fat metabolism and nutrient absorption. Symptoms of low bile production range from changes in bowel habits to skin and weight issues. Addressing any underlying causes and supporting bile secretion can help treat bile deficiency effectively.


Find out more information here >  https://bit.ly/bilesigns

Sunday, December 24, 2023

Unleashing the Power of Castor Oil: Topical Uses for Enhanced Well-being


In the realm of holistic wellness, castor oil stands as an unsung hero, revered for its myriad benefits. In this comprehensive guide, we delve into the versatile world of castor oil uses topical, focusing on its exceptional topical applications that go beyond conventional wisdom.


Understanding Castor Oil

castor oil benefits


Castor oil, derived from the seeds of the Ricinus communis plant, boasts a rich history dating back centuries. Known for its potent therapeutic properties, it has found a significant place in traditional medicine and is now gaining renewed recognition in contemporary well-being practices.


Nourishing Your Skin: Castor Oil for Topical Hydration

The Elixir for Dry Skin

Dry, flaky skin is a common woe, and conventional moisturizers may fall short. Enter castor oil, a natural emollient that penetrates deep into the skin, providing intense hydration. Its fatty acid composition, predominantly ricinoleic acid, works wonders in restoring the skin's moisture balance.


Combatting Signs of Aging

Bid farewell to fine lines and wrinkles with castor oil's remarkable anti-aging properties. Rich in antioxidants, it aids in the production of collagen, promoting skin elasticity and a youthful glow. Regular application can visibly reduce the signs of aging, offering a natural alternative to commercial anti-aging products.


Castor Oil as a Hair Care Dynamo

Revitalizing Scalp Health

castor oil uses topical


A healthy scalp is the foundation for luscious locks. Castor oil's antibacterial and antifungal properties make it an ideal tonic for scalp health. Massage a concoction of castor oil and a carrier oil into your scalp to nourish hair follicles, reducing dandruff and promoting overall hair health.


Stimulating Hair Growth

Thinning hair or hair loss is a concern for many. Fear not, as castor oil's ricinoleic acid stimulates blood circulation to the scalp, encouraging hair growth. Incorporate it into your hair care routine for fuller, thicker locks that exude vitality.

Bid farewell to unruly tresses with castor oil's exceptional ability to lock in moisture. Apply a small amount to damp hair for a natural, frizz-free finish that exudes health and vitality. A healthy scalp is the secret to luxurious locks. Castor oil, with its nourishing properties, becomes a potent elixir for scalp health. A weekly massage with castor oil stimulates circulation, ensuring your scalp remains a fertile ground for vibrant, strong hair


Alleviating Aches and Pains: Castor Oil as a Topical Analgesic

Soothing Joint Discomfort

castor oil uses


For those grappling with joint pain, castor oil's anti-inflammatory properties offer solace. Its application on affected areas can provide relief from pain and discomfort, making it a natural alternative to conventional pain relief creams.


Easing Muscle Tension

Whether it's post-exercise soreness or a long day at the desk, muscle tension is a common woe. Castor oil's analgesic properties make it an effective massage oil, soothing tired muscles and promoting relaxation.


Banishing Acne Woes

Acne, meets its match with castor oil's antimicrobial properties. Acting as a natural cleanser, it penetrates pores, dissolving impurities and curbing the growth of acne-causing bacteria. Regular use unveils a clearer complexion, leaving acne scars mere vestiges of the past.


Say Goodbye to Stubborn Scars

The journey to flawless skin often encounters scars along the way. Fear not, as castor oil's regenerative abilities become your ally. Rich in fatty acids, it promotes the growth of healthy tissue, gradually diminishing the appearance of scars and blemishes.


Targeted Relief: Castor Oil for Pain Management

Alleviating Menstrual Discomfort

Ladies, rejoice! Castor oil compresses emerge as a natural remedy for menstrual discomfort. The oil's anti-inflammatory nature eases cramps, providing a soothing balm during those challenging days.


Crafting Castor Oil Compresses for Targeted Healing

Harnessing the Power of Compress Therapy

Castor oil compresses are a time-honored tradition for targeted healing. Whether addressing liver health or menstrual discomfort, these compresses offer a holistic approach to well-being. The oil's innate ability to penetrate the skin makes it an ideal medium for delivering healing benefits directly to the affected area.